LED light condensation is a common concern in outdoor luminaires, street lights, floodlights, industrial fixtures and vehicle lamps. A transparent lens may become cloudy after rain, washing, cold starts or rapid temperature changes. In some cases, the mist is temporary and disappears during operation. In other cases, persistent droplets or water accumulation indicate a sealing, ventilation or assembly problem.
Replacing the optical lens immediately does not always solve the issue. Condensation can be caused by moisture already trapped inside the housing, pressure changes, damaged gaskets, blocked vents, cable-entry leaks or mechanical stress around the lens. The correct solution starts with distinguishing normal temporary fogging from actual water ingress.
This guide explains why condensation forms, how to inspect an LED luminaire, which components affect moisture protection and what should be checked before mass production.
What Causes Condensation Inside an LED Light?
Air inside a luminaire contains a certain amount of water vapor. When the fixture operates, the LED, driver and other internal components generate heat. The air inside the housing warms and expands. When the fixture is switched off or exposed to cold rain and low ambient temperatures, the internal air cools and contracts.
If the inner surface of the lens becomes colder than the dew point of the air inside the housing, water vapor changes into small liquid droplets. This is the basic reason that condensation inside LED lights can occur even when the housing appears sealed.
The risk is higher when:
- The luminaire is assembled in a humid environment
- Warm air inside the housing cools rapidly after switch-off
- The lens is exposed to cold rain or strong outdoor temperature changes
- The housing has a large internal air volume
- The fixture produces little heat and moisture evaporates slowly
- Air cannot move through a pressure-equalization vent
- Moisture is trapped behind the lens during assembly
LED fixtures often operate at lower visible surface temperatures than traditional lamps. As a result, a thin layer of mist may remain visible for longer instead of disappearing immediately. The presence of a short-lived mist does not automatically prove that the lens or housing has failed.
LED Light Condensation vs. Water Ingress
The most important diagnostic step is to determine whether the fixture has temporary condensation or a path through which liquid water is entering. The two conditions can look similar during a quick visual inspection, but they require different actions.
| Observation | Possible condition | Recommended action |
|---|---|---|
| Thin mist appears after a rapid temperature change | Temporary condensation | Observe whether it clears during operation or as conditions stabilize |
| Light haze disappears after the fixture operates | Moisture vapor may be leaving the housing | Continue controlled observation and inspect the venting design |
| Large droplets remain for a long period | Possible sealing or ventilation problem | Inspect the gasket, lens edge, housing and breather path |
| Water collects at the bottom of the housing | Likely water ingress | Stop normal operation and identify the entry path |
| Fogging repeatedly appears in the same local area | Cold surface, local leak or trapped moisture | Review the local geometry, seal compression and thermal behavior |
| Corrosion, flicker or driver instability is present | Prolonged moisture exposure | Perform electrical and mechanical failure analysis |
A thin temporary film may be acceptable in some lighting systems if the optical aperture clears within the specified operating period. Permanent water droplets, repeated pooling or corrosion should not be treated as ordinary fogging. HELLA describes the same distinction for vehicle lamps: temporary mist may clear as the lamp warms, while persistent droplets or accumulated water require inspection of the seal and ventilation system. Read the technical condensation guidance from HELLA.
Why Can an IP65 or IP66 LED Light Still Fog Up?
IP ratings describe protection against dust and water under defined test conditions. They do not mean that the air inside a luminaire contains no moisture, nor do they guarantee that condensation can never appear on an optical surface.
An IP rating for an LED luminaire should therefore be understood as one part of the complete environmental design. Actual field performance also depends on:
- The condition and compression of the lens gasket
- The flatness of the lens and housing sealing surfaces
- The torque and sequence used for fastening
- The position and condition of the breather vent
- The waterproofing of cable glands and connectors
- The orientation of the fixture during installation
- Moisture trapped during assembly or storage
- Cracks, warpage or deformation after thermal cycling
A luminaire may pass a laboratory water test and still develop field condensation if humid air is trapped inside, if the vent is blocked or if assembly tolerances change the gasket compression. Conversely, a temporary mist does not necessarily indicate that the IP protection has failed.
Common Moisture Entry Paths in an LED Luminaire
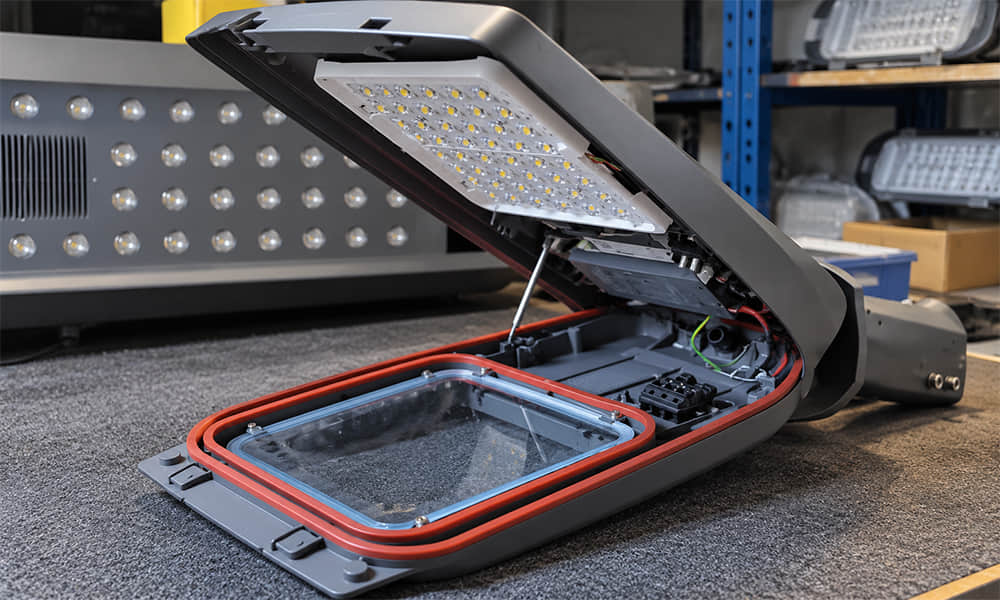
Lens-to-Housing Sealing Interface
The joint between the optical lens and the housing is one of the most important moisture barriers. A gasket must sit in the correct position and be compressed within its intended range. Too little compression may leave a leakage path. Excessive compression can deform the lens, damage the gasket or create uneven pressure around the perimeter.
The sealing surface should be free from dust, flash, scratches, molding defects and other contamination. A small particle can create a local gap that is difficult to see during normal visual inspection.
Screws and Uneven Fastener Torque
Large lenses and lens arrays can be sensitive to uneven fastening. If one screw is tightened significantly more than the others, the lens may bend or the gasket may compress unevenly. The result can be a local leak at one side of the housing.
Fastening order, screw type, torque and support-point location should be defined in the assembly procedure. A lens that is flat before installation may no longer remain flat after excessive or uneven tightening.
Cable Glands and Connectors
Water does not always enter through the front lens. Cable glands, connectors and poorly sealed wire exits can allow moisture to enter the housing. Once inside, water vapor may travel through narrow cavities or collect at the coldest optical surface.
The cable diameter should match the gland. Connectors should be suitable for the intended environment, and cable routing should prevent water from flowing directly toward an entry point. The entire cable path must be inspected when investigating moisture inside an LED light.
Breather Vents and Pressure Equalization
Many outdoor luminaires use a pressure-equalization vent or breathable membrane. The purpose is to allow air pressure to equalize while limiting liquid-water penetration. A blocked, damaged or incorrectly positioned vent can increase internal pressure differences during heating and cooling.
The vent should not be covered by sealant, paint or mounting components. Its location should also be considered in relation to rain exposure, drainage and the final installation orientation.
Cracks and Mechanical Damage
Fine cracks may develop after lens installation, thermal cycling, impact, chemical exposure or excessive mechanical stress. They may not be visible when the part is first removed from its package.
Inspect the lens edge, screw-hole area, support legs, sealing flange and corners under suitable lighting. If a crack appears after installation, compare the assembly torque and support condition before assuming that the raw material alone is responsible. More information about this failure mode is available in our article on why LED lenses crack after installation.
How the LED Lens and Gasket Affect Moisture Protection
An optical lens is normally selected for light distribution, efficiency and LED compatibility. In an outdoor luminaire, its mechanical geometry also affects environmental protection. The optical component may include a flange, sealing groove, locating feature, support leg or integrated gasket interface.
Important design checks include:
- Whether the lens flange matches the housing sealing surface
- Whether the gasket remains correctly located during assembly
- Whether the lens thickness can withstand the fastening load
- Whether the optical surface remains stable after temperature changes
- Whether the lens has sufficient flatness around the sealing perimeter
- Whether support points prevent excessive bending or local stress
- Whether the sealing structure is compatible with the selected material
For a multi-LED street-lighting lens, the sealing interface should be evaluated together with the LED array and PCB. The lens must remain aligned with the LEDs while also maintaining stable compression around the perimeter. A mechanically secure seal that shifts the optical cells away from the LED centers can create both moisture and photometric problems.
Asahi’s IP66 3x8 street-lighting lens is one example of an outdoor PC optical component specified for a 173 x 71.5 mm profile, 5050/3030/2835 LED compatibility and IP66 outdoor use. The complete luminaire still requires customer-side housing, gasket and assembly validation because the IP result belongs to the finished system.
How to Diagnose LED Light Condensation Step by Step
1. Record When the Fogging Appears
Note whether the mist appears after rain, washing, switch-off, cold start, overnight storage or a sudden temperature change. Also record ambient temperature, relative humidity and fixture operating time.
2. Classify the Moisture
Determine whether the lens has a light film, isolated droplets, continuous water, or pooled liquid. A photograph taken at the same exposure and viewing angle can help compare the condition over time.
3. Check Whether the Optical Aperture Clears
Operate the fixture under a controlled condition and monitor the lens. If the mist gradually clears, moisture may be leaving the housing. If droplets remain or increase, inspect the sealing and ventilation system.
4. Inspect the Lens and Housing
Look for cracks, deformation, damaged corners, molding flash, scratches on the sealing surface and marks that indicate uneven gasket pressure. Inspect both the lens and the mating housing rather than replacing only one part.
5. Check the Gasket and Fastener Condition
Verify the gasket material, cross-section, position and compression. Review the assembly torque, screw sequence and whether the housing has sufficient support around the optical aperture.
6. Inspect Vents, Cable Entries and Connectors
Confirm that the breather vent is open and correctly installed. Check cable glands, connector seals and wire routing. A waterproof lens cannot compensate for an unsealed cable entry.
7. Reproduce the Condition in a Controlled Test
Use the actual assembly and intended installation orientation. Reproduce relevant temperature changes, humidity exposure and water spray conditions according to the project’s test specification. Record the condition before, during and after the test.
8. Compare Optical and Electrical Performance
After environmental testing, inspect light output, distribution, color, uniformity and electrical operation. Moisture may affect the optical path before it causes an obvious driver failure.
Tests to Complete Before Mass Production
Condensation problems are easier to correct during design verification than after a luminaire has entered mass production. A practical validation plan should include the complete lens, gasket, housing, PCB, LED and driver assembly.
Dimensional and Assembly Inspection
Measure the lens flange, housing sealing surface, gasket position and critical locating features. Confirm that production parts can be assembled without twisting or compressing the lens unevenly.
Gasket Compression Check
Verify the intended compression range around the complete perimeter. A single cross-section measurement may not reveal local under-compression near corners, screw holes or changes in housing geometry.
Water and Dust Protection Testing
Perform the applicable IP test using production-representative components and assembly methods. The test should include the intended cover, gasket, fasteners, cable entries and vents. A lens tested alone cannot represent the environmental performance of the finished luminaire.
Thermal Cycling
Temperature cycling can reveal deformation, seal relaxation, cracking and pressure-related moisture behavior. Inspect the lens and gasket after the cycle, not only while the fixture is operating.
Humidity Exposure
Humidity testing helps evaluate moisture retention and the ability of the housing to manage internal water vapor. The initial moisture condition of the assembly should be controlled so that test results can be compared between samples.
Repeated Assembly Testing
If the luminaire may be opened during maintenance, repeat assembly and disassembly can affect gasket seating and fastener torque. Test the expected service procedure instead of validating only a new, untouched assembly.
The LED lens optical performance testing guide explains why mechanical fit, optical output and production consistency should be verified together rather than relying only on a visual inspection.
How to Reduce Condensation and Water Ingress Risk
There is no single lens feature that eliminates every condensation problem. The most reliable approach combines moisture control during assembly, stable sealing geometry and appropriate pressure management.
- Assemble optical components in a controlled, clean and suitably dry environment
- Keep the lens and gasket sealed in their packaging until they are needed
- Clean sealing surfaces before closing the housing
- Use the gasket profile and material specified for the housing design
- Control fastener torque and tightening order
- Provide adequate mechanical support around large lens apertures
- Keep breather vents open and protected from sealant or contamination
- Use properly sealed cable glands and connectors
- Design drainage paths for any water that reaches non-sealed cavities
- Test the fixture in its real mounting orientation
- Inspect the lens after thermal cycling and vibration testing
- Compare optical performance before and after environmental validation
Cleaning is also important during production and maintenance. Fingerprints, oil and aggressive solvents can damage optical surfaces or alter the lens material. Asahi’s LED lens maintenance guide recommends mild soap, water and a soft cloth for suitable cleaning situations, while warning against industrial solvents and careless handling.
Material Considerations for Outdoor LED Lenses
The choice between PC, PMMA and other optical materials should be based on the complete application. Optical transmission, impact resistance, temperature behavior, UV exposure, chemical compatibility and molding requirements may all affect long-term performance.
Material selection alone does not determine whether condensation will occur. A high-transmission lens can still fog if humid air is trapped inside the housing. Similarly, a durable PC lens cannot compensate for a damaged gasket or an unsealed cable gland.
When selecting an outdoor lens, review:
- Operating and storage temperature
- Expected UV and weather exposure
- Impact and vibration conditions
- Lens thickness and mechanical loading
- Compatibility with gasket and housing materials
- Cleaning chemicals used during installation or maintenance
- Dimensional stability after thermal cycling
- Optical transmission and distribution after environmental testing
These factors should be evaluated using the actual material grade and molded geometry. Generic material claims are not a substitute for testing the final part.
What Should Be Included in a Moisture Failure Investigation?
A useful failure report should record more than “the lens is foggy.” Include the fixture model, lens model, material, gasket type, assembly date, installation orientation and environmental conditions.
Where possible, collect:
- Photographs before and after operation
- Time required for mist to appear or disappear
- Ambient temperature and humidity
- Recent rain, washing or maintenance history
- Location of droplets or water accumulation
- Gasket condition and compression marks
- Fastener torque records
- Vent and cable-entry inspection results
- Evidence of cracks, corrosion or electrical instability
- Water-test and thermal-cycle results
This information helps separate a lens-material issue from a housing, seal, assembly or environmental issue. It also makes communication between the luminaire manufacturer, optical supplier and production team more efficient.
Evaluate the Complete Lens and Sealing Assembly
LED light condensation is usually a system-level issue. The optical lens, gasket, housing, vent, cable entry, PCB, driver and installation position all influence what happens inside the luminaire.
A short-lived mist may be a normal result of temperature and humidity changes. Persistent droplets, pooled water, corrosion or recurring fogging in the same area require a structured inspection. The correct response is to identify the moisture path, verify gasket compression, check pressure equalization and test the complete production assembly.
For outdoor street lights, area lights and industrial luminaires, Asahi Optics can review an existing optical component together with the customer’s LED arrangement, housing dimensions and sealing structure. If you need help evaluating an IP66 optical lens or an existing sealed lens assembly, contact Asahi Optics to request an existing lens recommendation.